Kelp
How I develop Black and White film easily at home
- 9 Mar 2022
- ⌘
- 3 min read
Table Contents
1. Intro
Developing is quite similar to cooking pasta, you can have al dente if you grab the time. If its cooked more time you get a bit more fluffy, if its less cooked it will be more sturdy, but it is really hard to cook a pasta that is not edible.

There are different timings for each film, different chemicals to use, different steps, and different equipment to use, but it is quite hard to come out with a blank film. Most of the time, it will be a problem that happened before you develop the film, like expired film, film that you haven’t shot (yes, that happens), or shooting with dim light and without a flashlight.
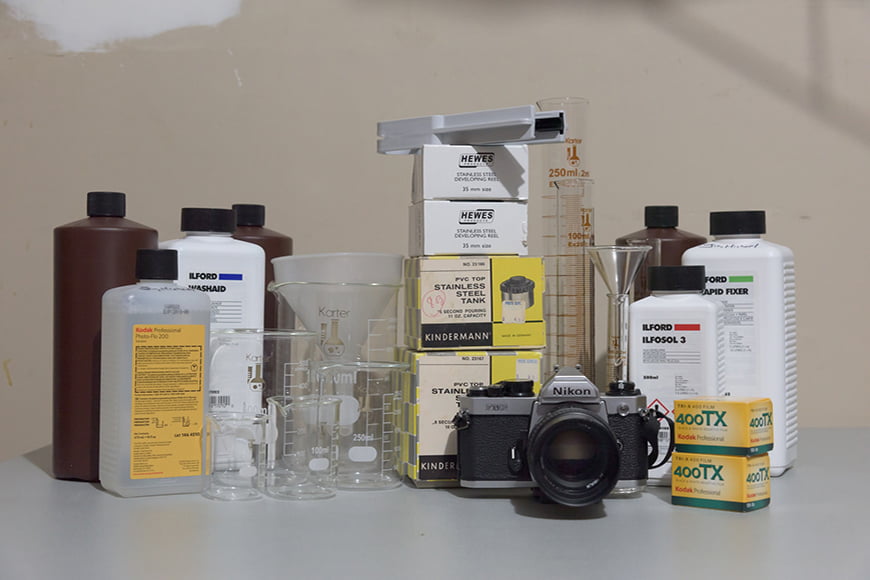
1.1 Tools
Here are some tools you may need, some can be replaced by similar tools. The most expensive usually will be the tank and the chemicals. The more you develop, the cheaper your equipment goes per film.
- Scissors
- Film Changing Bag
- Film Leader Retriever
- 4x Measuring Beakers
- 4x Thermometers (yes, in plural)
- 4x Crystal Sticks
- RO/filtered water
- Crystal Funnels
- Ice cubes or cold water.
- Timer (can use the one on your phone or some film develop app).
- Notes (for writing down the times and steps for each film you are going to develop).
- Brown Crystal Bottles (for the film development liquid storage)
- Clothespins
- Bottles for chemical purposes
- Chemicals
- The Film Developer
- The Stop Bath or Acidic Water
- The Fixer
- The Wetting Agent or Salty Water
1.2 Learning
DISCLAIMER: This tutorial is aimed to show how I develop film for, giving you a reference and example, it is always encouraged to learn and experiment with different methods and from mulitple sources. My method may not be the cheapest, most recommended, or best way, but it worked for me. Always do it at your own risk, and I am not responsible for any damage that may occur.
It will be better to be over-prepared than under-prepared. You will not be ruining your films because you missed or skipped some knowledge. Take a look into multiple sources, blogs, websites, YouTube videos, or even learn with some friends who have already done it. You may have some film development events in your city, join one of them before you buy all the equipment and develop it without experience. Maybe you will feel that developing is not your thing, and you will save a big hassle letting others develop for you.
Some chemicals should be poured onto crystal recipients, others can be poured onto plastic ones. The plastic recipients are cheaper, lighter (can be around three times lighter), and not easy to break, but can be corroded by some chemicals. Try to always use the same beakers for the same chemicals, for that, you can label each of the beakers.
2. Steps

2.0 Preparing
Check the expiring date of your chemicals. Besides the original recipients of the chemicals that already have their factory expiring date, you need to label the expired date on the recipients that you have used chemicals from previous developments.
Clean your equipment before use to avoid contaminations from previous developments or simply the dust accumulated on them since then.
Prepare and mix the chemical on the recipients.
For the chemicals, there are a lot of options from Kodak, Ilford, and other brands; some are for general purpose, and others are made for specific films like the TMAX film developer aiming to develop TMAX films.
You will need the film developer and the fixer. I use Kodak D76 and Kodak Rapid Fixer (which are in two bottles, A & B).


kodak D76 and Kodak Rapid Fixer
For the stop bath and rinsing chemicals, you can easily DIY yourself or buy ready-to-use chemicals like the film dev and fixer. Further explanation on the 2.1 Mixing part of this blog.
It is recommended that the room is around 20°C, as that is what the timing of the development is shown. It is like cooking pasta, it will not be the same if the water is not at 100°C.
2.1 Mixing

Here, we will be preparing the final ready-to-use liquids that will be poured into the tank.
Mix each of the four chemicals using a container. It is convenient to make as much liquid as your tank can handle. In my examples, I use measurements for a 1L tank.
2.1.1 Film Developer

- Pour 800 mL of 50°C hot water into a glass measuring beaker.
- Add 109 mL of Kodak D76
- If it is another developer, you should follow the instructions of the manufacturer.
- Mix it with a crystal mixing stick until the liquid is crystal clear.
- Add room-temperature water until the beaker is 1000 mL.
- Put it in a brown crystal bottle and wait until the water is 20°C.
The most purists will remake a new batch (the process done above) for each new film development or only use it on the same day, but many people, including me, will store it for six months if the bottle is full or two months half full.
2.1.2 Stop Bath
For safety, first I prepare Diluted Acidic Liquid (DAL), then the DAL will be further diluted into the final Stop Bath Liquid (SBL).
Diluted Acidic Liquid (DAL)
I made the DAL from acetic acid, systematically named ethanoic acid, which you can easily buy in any chemical store. The DAL will be used for multiple batches of developments and you will not deal with pure acetic acid that often as if you need to make a SBL from pure acetic acid each time you do a batch of film dev. To make 1L of DAL:
- Pour 720mL of RO water into a crystal beaker.
- Pour 280mL of acetic acid. (always pour water first)
- Store it in a bottle.
Stop Bath Liquid (SBL)
When you want to prepare to develop film you will take the bottle with your premade DAL and further dilute it. For 1L of SBL:
- Pour 950mL of RO water into a beaker
- Pour 50mL of Diluted Acidic Liquid
- Mix it with a crystal stick.
2.1.3 Fixer
WARNING: If the liquid smells like sulphur, don’t use it, dispose of it.
I use a Kodak A+B Fixer; other products will work differently, take a look at the product instructions. To make 1 L of my Kodak A+B Fixer:
- Add 500 mL of 16-27°C water.
- Add 249 mL of solution A.
- Stir it to let it mix with the water.
- Add 27 mL of solution B.
- Add water until it is 1 L.
2.1.4 Rinse Liquid
It is okay to use filtered water, but for better results, you can mix NaCl with water. The NaCl can be bought in a chemical store and is not the same as the salt we use for cooking. This liquid can be used for five batches. For 1 L of Rinse Liquid:
- Pour 1 L of RO water into a beaker.
- Add 30 g of NaCl.
2.2 Rolling
Here is the step where people are more scared. The step to take the film roll from the canister to the develop tank. Note that you should put film that has the same develop time, or quite similar time if you are not a purist.
-
Slide out the film from the canister, there are different tools for that. The one for beginners may be the Film leader Retriever. Here is a short video from the YouTube channel try35.com:
-
Check if the reels in the tank are in 135 or 120.
-
You can hairdry the reels for about 5-10 seconds to soften the plastic, which may help with rolling the film in.
-
Put the film canisters (depending on how many films your tank can hold), scissors, developer tank, and film leader retriever in the black film changing bag.
-
For each film:
- Cut the two corners of the film so it will be something like a V shape, this will make it easier to slide it into the reels.

- Roll it from the canister to the reel.
- Repeat again for the other film canister if you have more films.
- Cut the two corners of the film so it will be something like a V shape, this will make it easier to slide it into the reels.
2.3 Developing
The steps 2.3 to 2.6 (Developing, Stopping, Fixing, and Rinsing) will be done while the film is inside the tank. You will be doing almost the same process, by adding and then removing water from the tank within a certain time.
The first liquid to add on the tank with the film inside is the film develop liquid. The film develop timming is like pasta, the duration of the cooking will vary depending in the type of pasta and the brand. To know how much time you can uses websites like The Massive Dev Chart.
IMPORTANT: Each time you stop stirring you should clap the tank with one hand to avoid bubbles stucked in the tank.
- Pour the develop liquid inside the tank and start stirring for 1 minute.
- Pause for 2 minutes
- Stir for secondsd1.
- **Repeat steps 3. and 4.until it istil the total duration time of your fidevent ends, which you cfind itind in The Massive Dev Chart1
- When the time ends, pour the liquid back to the recipient where it was.
Real Life Example
Here a example, of developing a 7-minute film like an Ilford PAN 100 with times:
- 0:00: Pour tdevelopper liquinsidento the tank and start stirrin1.
- 1:00: Stop stirring and clap on its bottom three time1.
- 3:00: Start stirring agai1.
- 3:30: Stop stirring and clap on its bottom three time1.
- 6:00: Start stirring agai1.
- 6:30: Stop stirring and clap on its bottom three time1.
- 7:00: Finish.
2.4 Stopping

Unlike the development time variation on the film development process, the Stopping, Fixing, and Rinsing have the same duration no matter the film used.
The stopping process is like when you throw the hot water on the pot where the pasta is, to stop cooking it. Here, the Stop Bath will stop the processing with the developing chemicals.
Here, the process is much simpler than when developing:
- Pour the stopping liquid into the tank.
- Stir for 30 seconds.
- Pour the liquid back into the recipient.
2.5 Fixing

Fixing is a bit like the developing process, alternating between stirring and not stirring. The process is:
- Pour the Fixer into the tank.
- Start stirring for 10 seconds.
- Stop stirring for 10 seconds.
- Repeat steps 2. and 3. for 3 minutes.
2.6 Rinsing
This is the more chill process as it is less crucial and difficult to get it wrong. The purist will use a special chemicals for that, but the common of the mortals use water or salty water (water + NaCl).

Photo credit: Liam Harrison
The steps using salty water:
- Tap water
- Pour normal/tap water in the tank.
- Stir for 30 seconds.
- Throw the water from the tank.
- Salty water
- Pour the salty water in the tank.
- Stir for 3 minutes.
- Throw the salty water from the tank.
- Running water
- Open the lid of the of the tank
- Start pouring running water through the tank for 10~15 min.
2.6.1 Saving Time
If you still have film to develop, you can start doing some preparations for the next batch while the water in running thought the tank.
- For example make/prepare new Salty water, film Developer and Stopping Liquid
2.8 Drying
Usually, you will hang it in a place that doesn’t have too much dust flying around, commonly in the bathroom. Here where the blog naming comes from.
Here is your film! source:https://naturespiritherbs.com/seaweed-harvest-notes-kelp-fronds-2019/
3. Maintaining
After developing, you should maintain your chemicals in a dry, chill, and without direct sun exposure, and clean your equipment. Although the chemicals nowadays are less toxic than in the past, you should still ventilate the bathroom where you have done the film development. That includes cleaning the toilet, sink where you have poured some chemicals and water related to the development, although you should follow the instructions on the manual of the chemicals as you may need to throw it in special facilities according to your country’s regulations.
4. References
- Learned from some friends.
- Some videos like: How to EASILY develop (and push) B/W film by Eduardo Pavez Youtube channel: